A Guide to Automated Alt Text Generation
Alt text, also called alt tags or alt descriptions, is a vital component for web accessibility and search engine optimization. It provides essential descriptions for images, enabling visually impaired users who rely on screen readers to navigate and understand your site. Additionally, alt text boosts your site's SEO by helping search engines understand the content and context of your images, leading to better indexing and improved search rankings. Despite its critical importance, manually adding alt text can be labor-intensive, time-consuming, and prone to human error.
Artificial Intelligence offers a powerful solution to automate the creation of alt text. By integrating generative AI with your Webflow CMS, you can ensure every image is accompanied by accurate and descriptive alt text, eliminating the need for manual effort and reducing the potential for errors. Here’s how you can leverage
Here’s an example of an image and the alt text generated using the process we’ll describe:
A woman smiling and using a laptop at a wooden table in a cozy room, surrounded by a coffee cup, cookies, books, and a comfortable seating area. Natural light fills the space, creating a relaxed and inviting atmosphere.

Now we will walk you through the process of setting up an automation that generates alt text for your Webflow CMS images whenever you create a new CMS item.
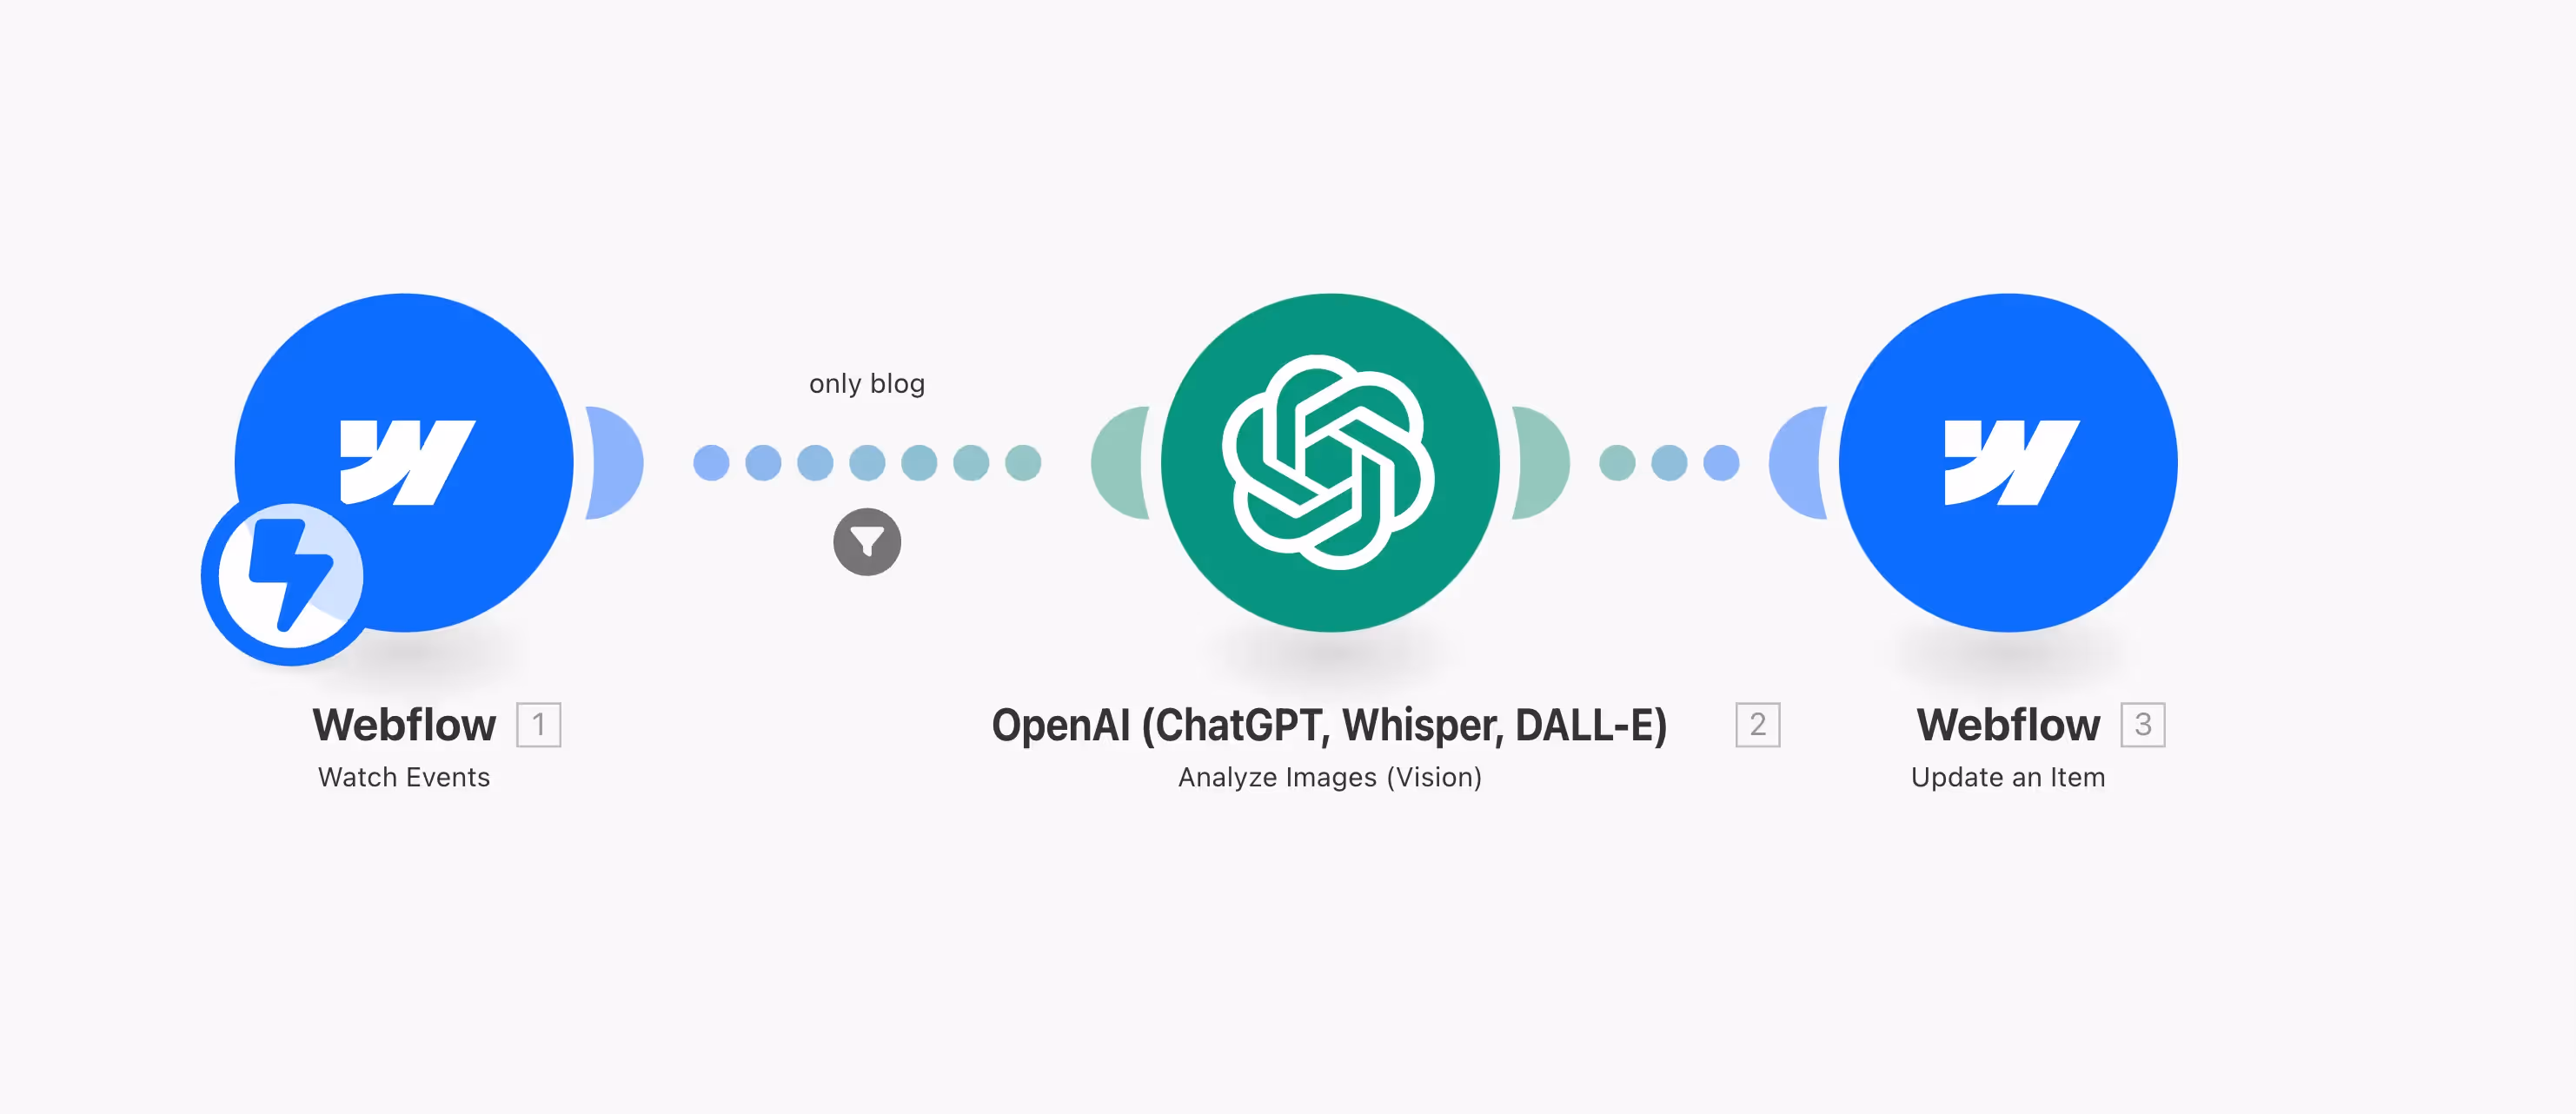
Step 1: Create a Scenario in Make
To get started, you'll need to create a scenario in Make.com. Here’s how:
1 - Sign up to Make.com: Create a new scenario in your Make account.
2 - Create a Webflow Trigger: In this case we want to use "Webflow: Watch events" as a trigger. Search for Webflow in the search bar, click it and select "Watch Events". This means that it will trigger when something is happening in our Webflow project.
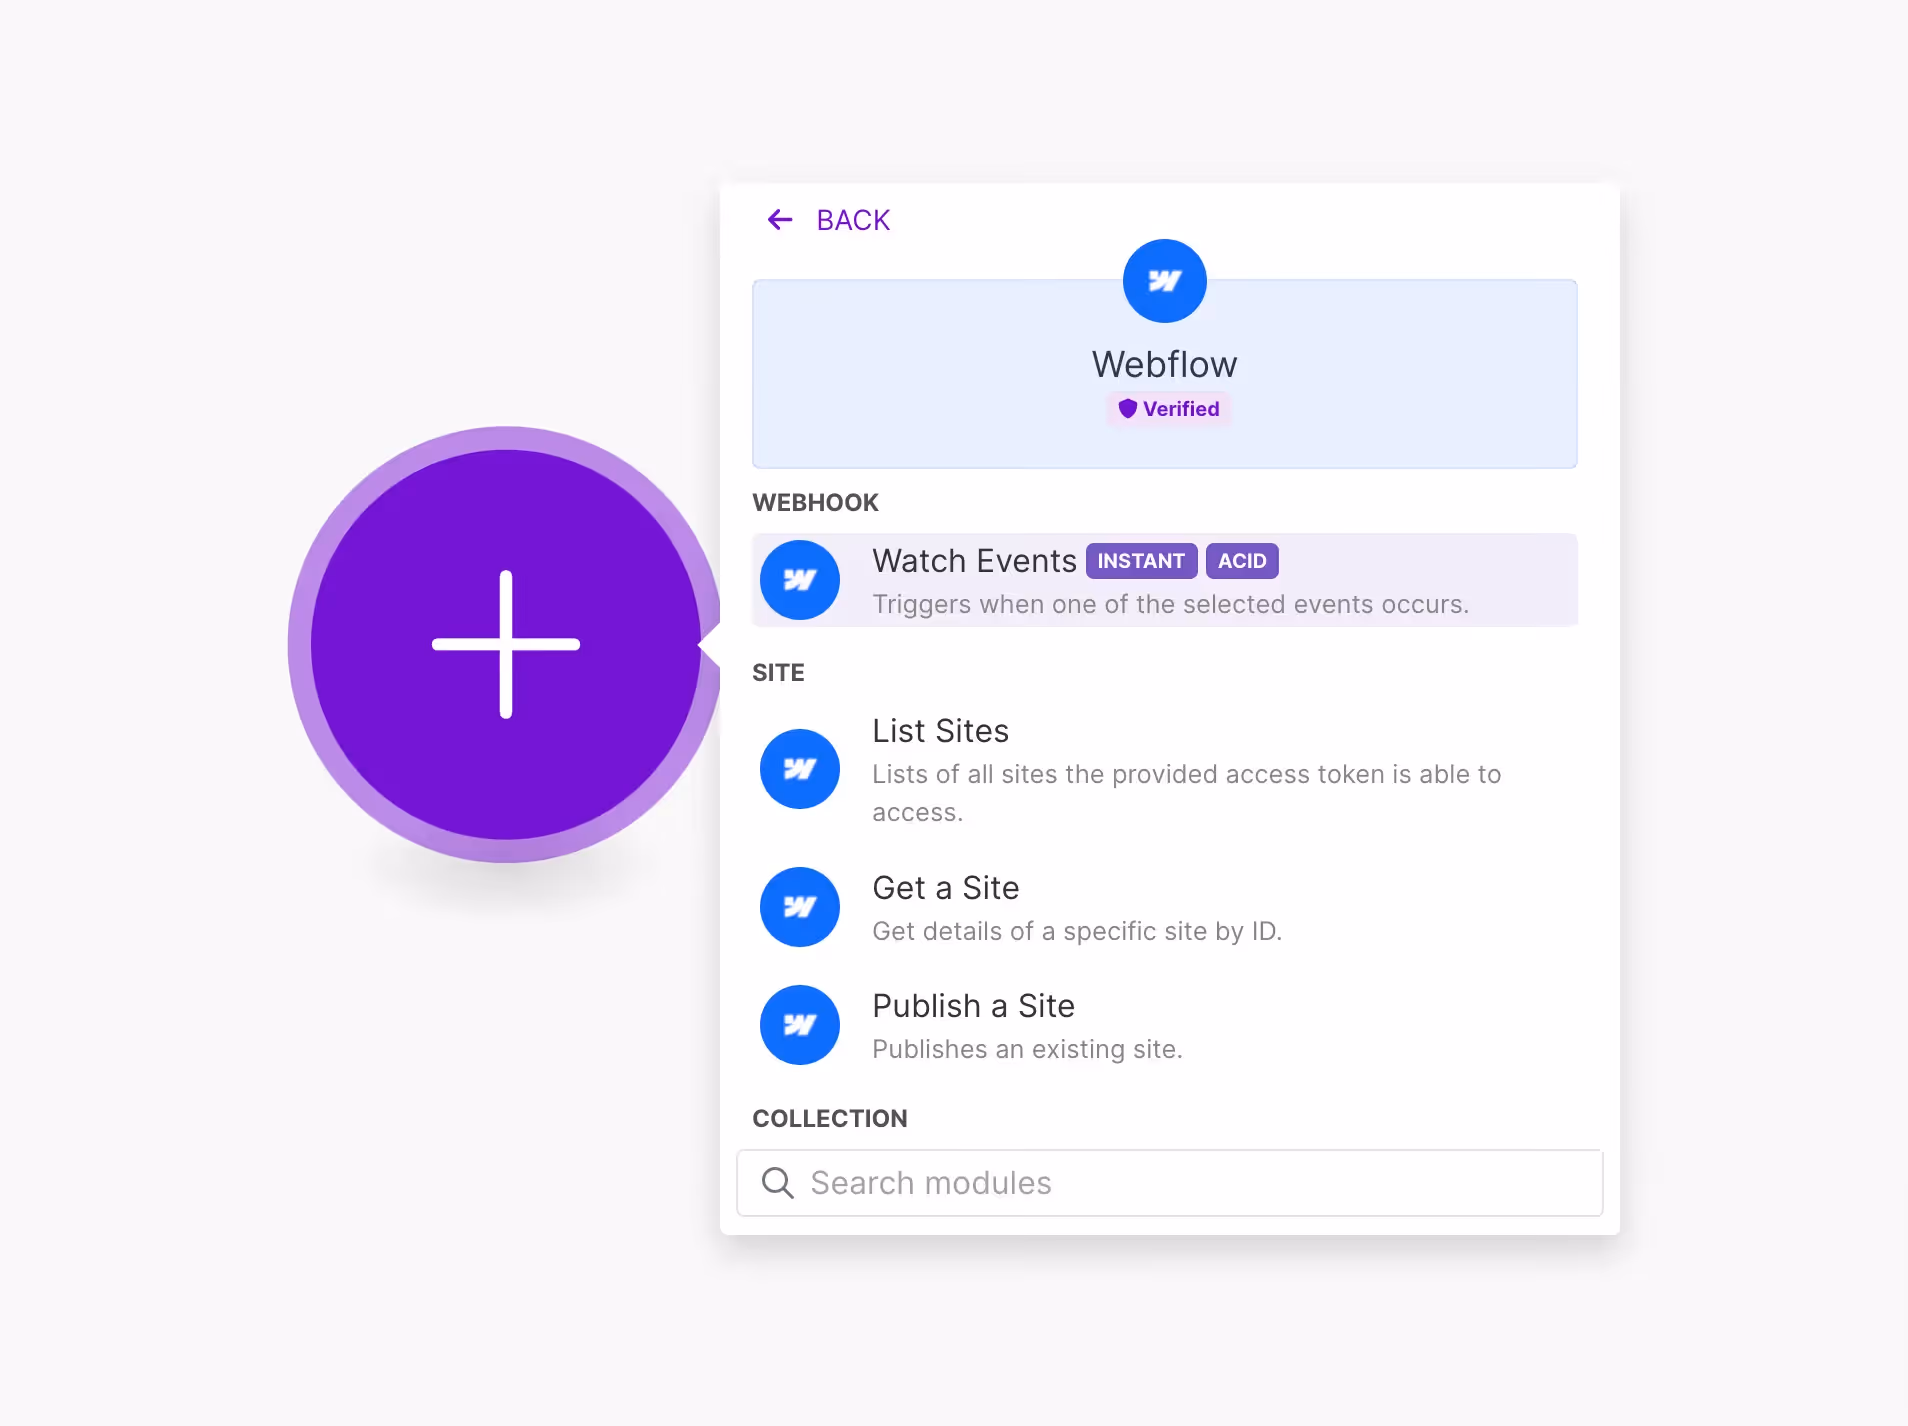
3 - Authorize the app: If it is the first time that you are making a connection with Webflow it will ask you to create a new connection where you will have to give Make access to your project, then save.
Now we have our first step in our Make setup.
Step 2: Setup OpenAI Module and Create Connection
Now let's create a connection to OpenAI.
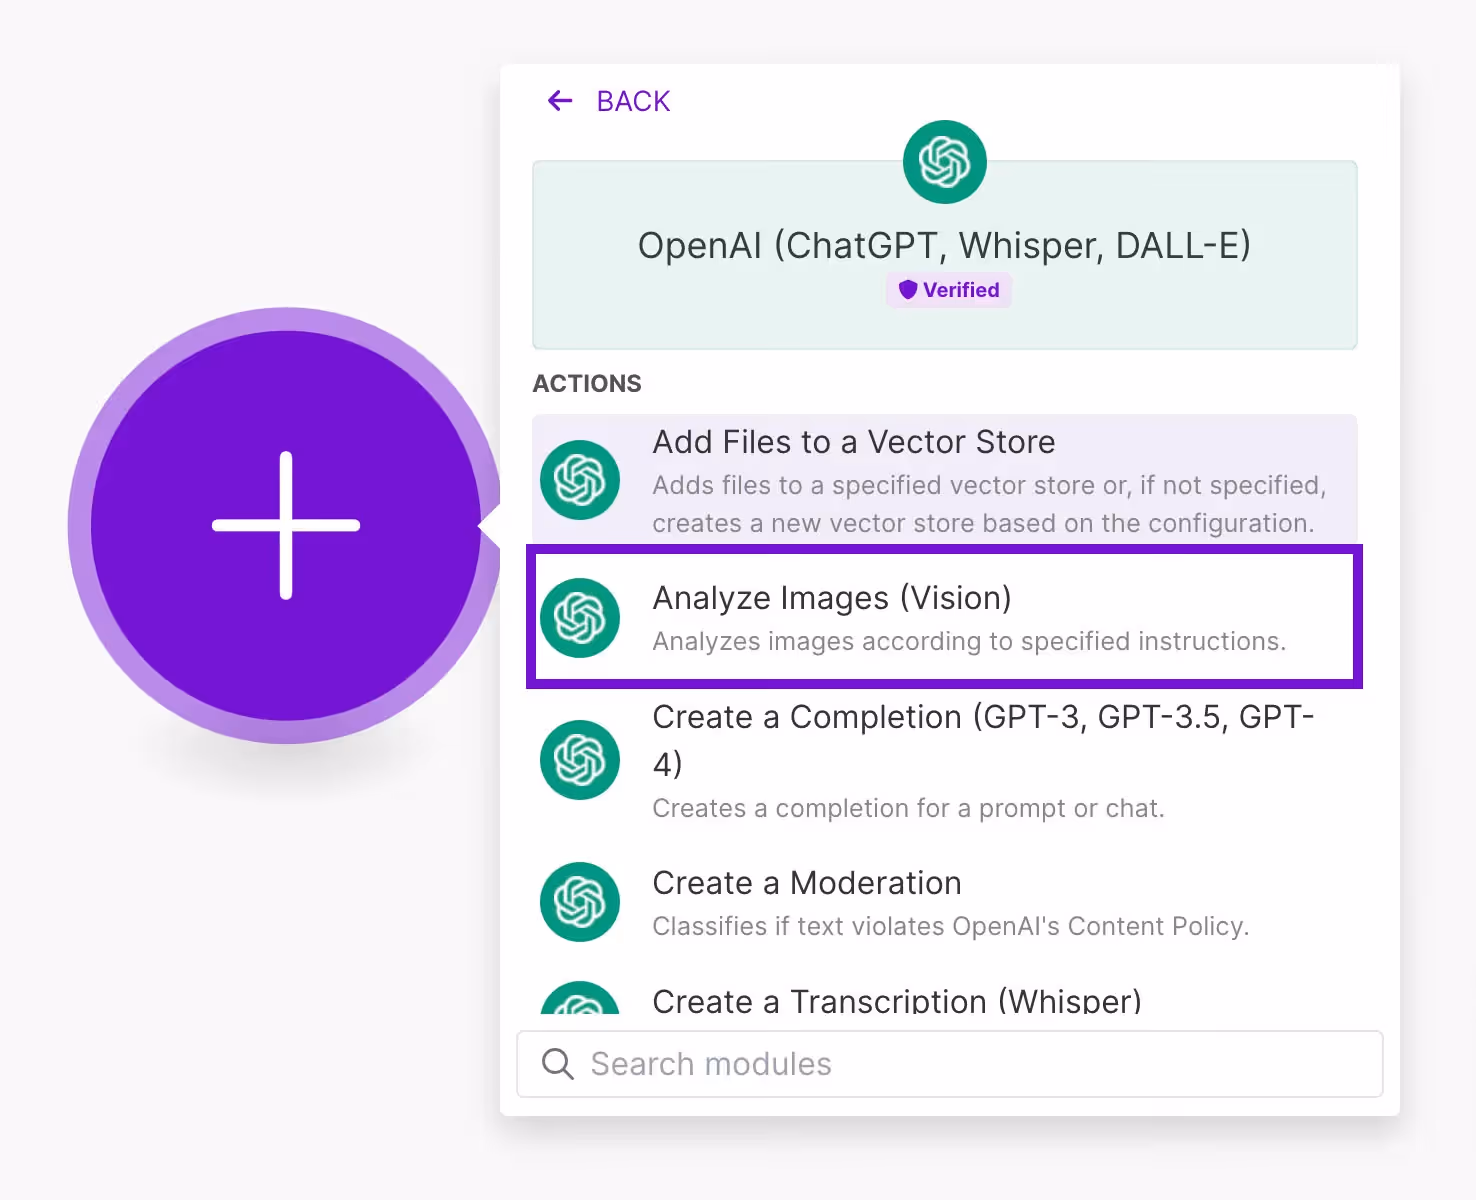
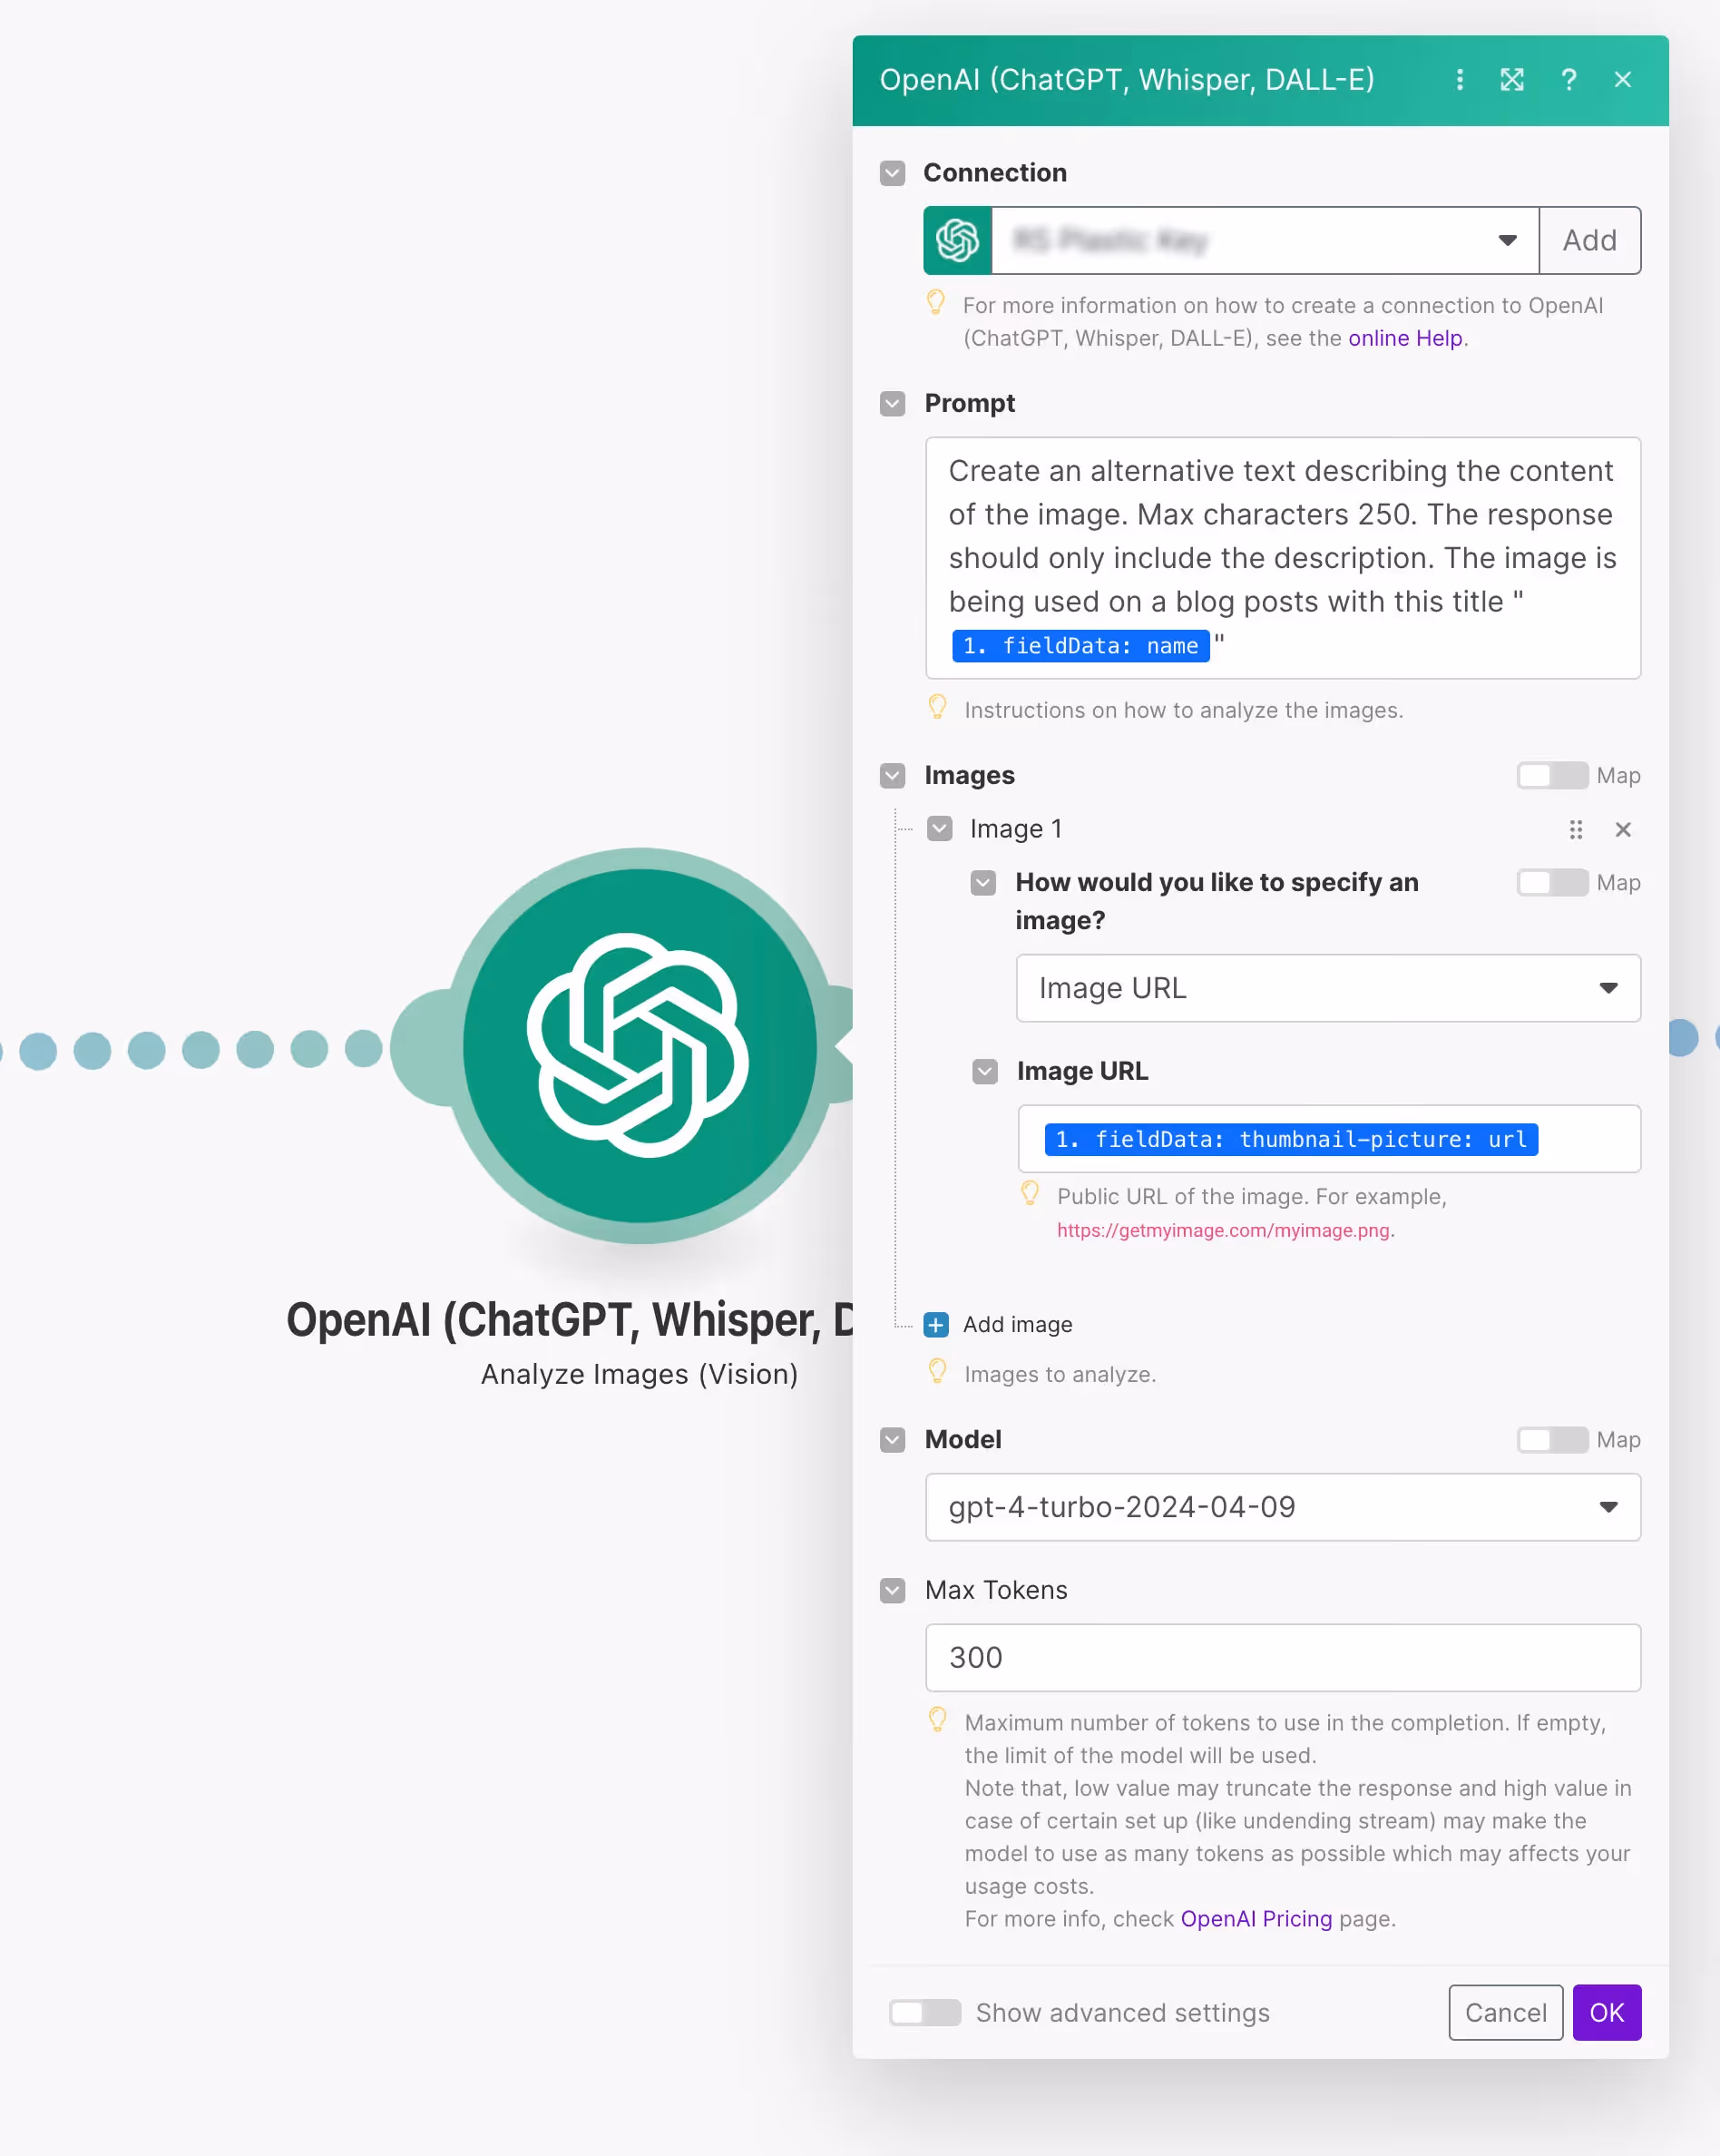
1 - Add a new module: In your Make scenario, add a new module and select OpenAI: Analyze Images (Vision) action.
2 - Create connection: You’ll need to authenticate your connection with OpenAI. Click "Create a connection" to create a new connection.
3 - API Key: Name your connection and input your OpenAI API key. If you don’t have an API key, you can generate one in your OpenAI account settings under "API keys". Ensure you have some funds in your OpenAI account to cover the usage costs.
4 - Save connection: Paste the API key in Make.com and hit save.
After the connection has been authenticated proceed with the following steps:
5 - Add a prompt: Create a prompt for generating alt text. This could be for example: "Create an alternative text describing the content of the image. Max characters 250. The response should only include the description."
6 - Add image URL: In the OpenAI module, provide the URL of the image from the Webflow CMS. You can grab this from the field data that the Webflow module provides.
7 - Choose model: Select the model for generating the alt text. We are using gpt-4-turbo.
8 - Set tokens: Set the max tokens to 300, which is usually sufficient for a concise description.
Step 3: Save the data in Webflow
Now we want to add the data generated by OpenAI in Weblow.
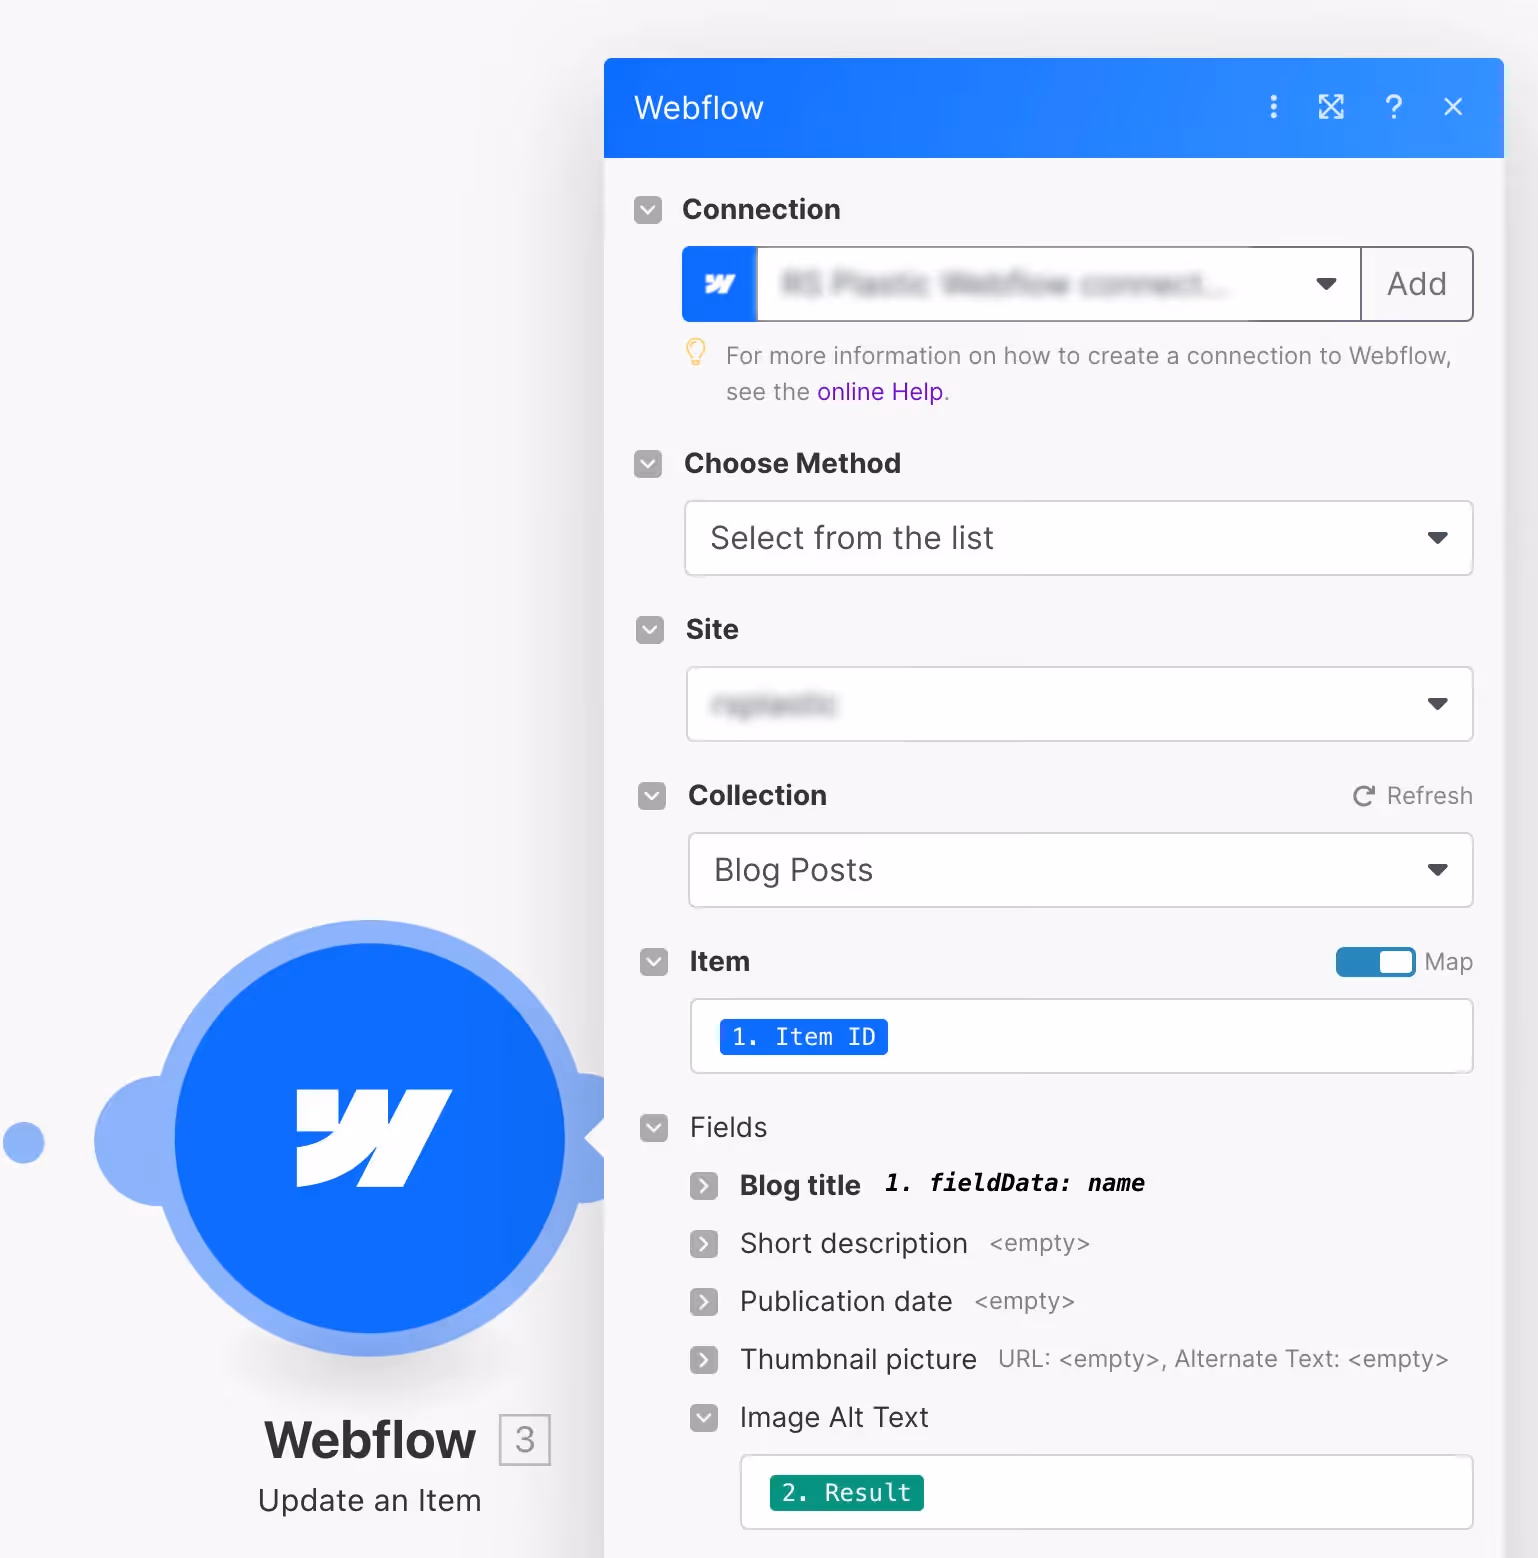
1 - Create a Webflow Module: Create another Webflow module and select "Update an Item". You may need to authenticate the connection with Make again, as now it wants to make changes to the CMS data.
2 - Choose the collection: Select the collection you want to modify.
3 - Adding Alt text: Select the field where you want to add the alt text generated from the OpenAI module (Result) and save.
Step 4: Test Scenario
Now we have finished creating our scenario and it is time to test it.
1 - Run Once: Click on the button "Run Once" in Make to test the scenario.
2 - Create a New CMS Item: In Webflow, create a new item in the collection connected to your Make scenario.
3 - Monitor the process: Check if Make receives the new item, processes the image through OpenAI, and updates the Webflow CMS with the generated alt text.
Once the scenario has been tested successfully, activate it by turning the switch under "Run once" on. Adjust the scenario if needed, for example creating extra filters.
Conclusion
Creating automatic alt text for Webflow CMS images using OpenAI and Make not only enhances your website’s accessibility but also streamlines and simplifies your content creation process. At Kvalifik we can help you take advantage of Webflow and Generative AI. Go to our Webflow or AI solution's page and schedule a free call to learn more.